
How to Grow Asparagus from Seed
Learn how to grow, harvest, and store homegrown asparagus from seed!

Growing Details for Asparagus:
- Plant: Perennial Vegetable (Asparagus officinalis)
- Color: Green
- Time to Harvest: 3-4 years from seed-started plant.
- Frost-Hardy: Yes
- Lifespan: Perennial plant may live for up to 20+ years with proper care, but spear size and yield decreases after ~15 years.
- When to plant: Start seeds indoors 2-3 months before your estimated final frost date. Transplant seedlings outdoors in spring.
- Edible: Yes
- Part eaten: Young stalks
- Requires support: No

Seed-Starting
Start asparagus seeds indoors 2-3 months before your estimated final frost date. The seeds should be soaked in water for 24 hours first before sowing.
To sow the seeds, fill a pot with soil- we use 4″ plastic pots- and wet the soil well, letting excess water drain out the bottom of the pot. Poke holes in the pot with your finger to 1/2″ deep, and drop a seed in each hole. We’ve found that a 4″ pot can grow 5-8 asparagus seedlings per pot, but you can drop this number down to 4, 2, or just a single plant per pot, if you prefer.
Cell packs don’t work the best here- the seedlings very quickly end up rootbound. If you are working with cell packs only and don’t have any pots, try to use the largest size cells you have, and only sow one seed per segment.
After you finish dropping in the seeds, cover them back over with soil, and gently tamp the surface even with your fingertips. Cover with plastic wrap or a greenhouse top to keep the moisture in. Keep seeds warm, moist, and in the light until germination occurs, usually within 2 weeks to 1 month from sowing. At this point, remove any covering.

Seedling Care
Keep seedlings evenly moist as they grow. If your seedlings appear crowded, carefully divide them into their own pots. Ideally, though, avoid handling or transplanting the seedlings until it’s time to plant them out, if you can.
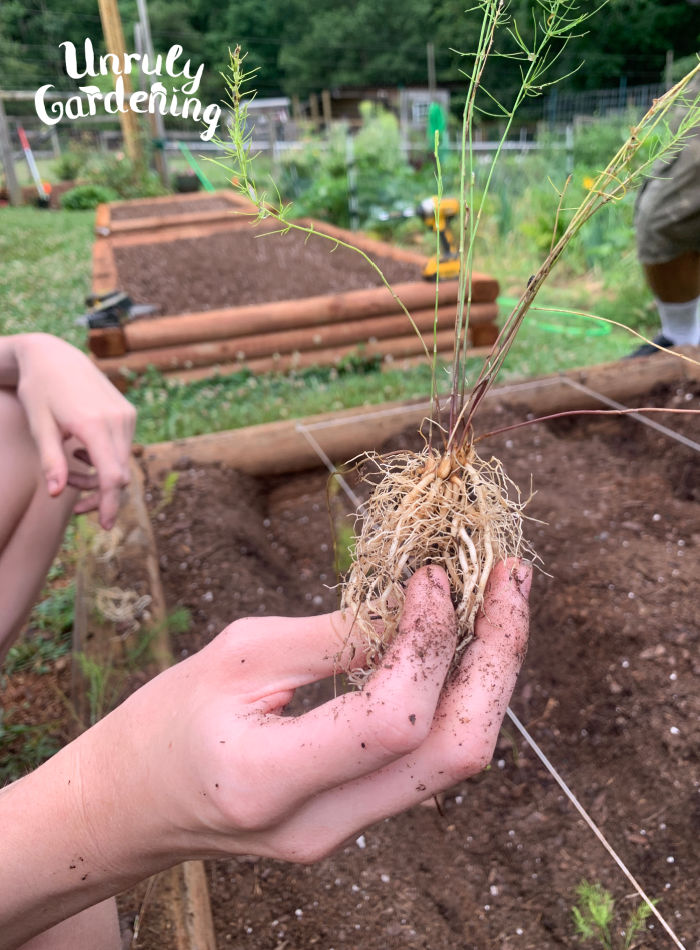
As the seedlings grow, they’ll produce multiple shoots of thin, ferny stalks and leaves. These come out of the soil, not from a main stem. Each shoot is not its own plant- it’s all from the same seed and roots. This is easier to see when you’ve just got one plant per container.
Avoid damaging or trimming the ferny leaves, and make sure the plant gets plenty of light.
Transplanting into the Garden
Seedlings should be at least 12 weeks old before transplanting, and should have undergone hardening-off for 2 weeks beforehand. Transplant baby seedlings in spring, after all risk of frost has passed.

Preparing the garden bed
Choose a location in full sun (meaning the area receives 6-8 hours of direct sunlight where the plants are not in shade), and make a large bed of rich, well-draining soil, with plenty of organic matter worked thoroughly in. Through this bed, dig a trench 1 ft wide, and 8″ deep. Scatter a small amount of bonemeal at the bottom of the trench. Add 2 inches of rich, well-rotted compost or manure to the trench, mounding the middle up a bit so you have a small hill inside the bottom of the trench. This trench what you’ll plant your asparagus seedlings into, right down the middle.
If planting multiple rows of asparagus, space your trenches 2-4 ft apart from each other.
It’s a wise idea to test your soil before planting. Asparagus likes a soil pH of around 7.0.
Planting Asparagus Seedlings
Plant your seedlings 18″-24″ apart from one another. Do your best not to snap or damage the roots, but still try to spread them out a bit in the trench. Think kind of like an octopus, with the crown in the center being the body. Cover with just 2-3 inches of soil- fill in the rest as time goes on, as the crowns develop and the plant grows.
After transplanting, water the plants well.
Growing & Care for Asparagus
First Year
Make sure to give your seedlings a regular supply of water in their first growing season. Aim for about 1″ of water a week. Sandy soils will likely require more frequent watering than those with heavy clay.
It’s important to keep the bed weeded so the roots don’t have any competition. Additionally, make sure to avoid damaging or pruning any of the leaves- the plant needs them to grow strong crowns!
When fall and winter arrive, wait for the foliage of your asparagus plants to die. It will turn brown or yellow, no trace of green. Only after you are certain that the foliage is dead, cut it back to 2″ above the ground. This helps to prevent overwintering asparagus beetles.
Optionally, you may want to add a layer of mulch over top your asparagus beds for the winter. Use 1-3 inches of your mulch of choice- straw is our choice of mulch.

Second Year
Your plants will send up shoots in spring. This year, begin gradually backfilling the trench as the seedlings grow. The shoots should be distinctly larger than last year’s, starting to be more recognizable as actual asparagus.
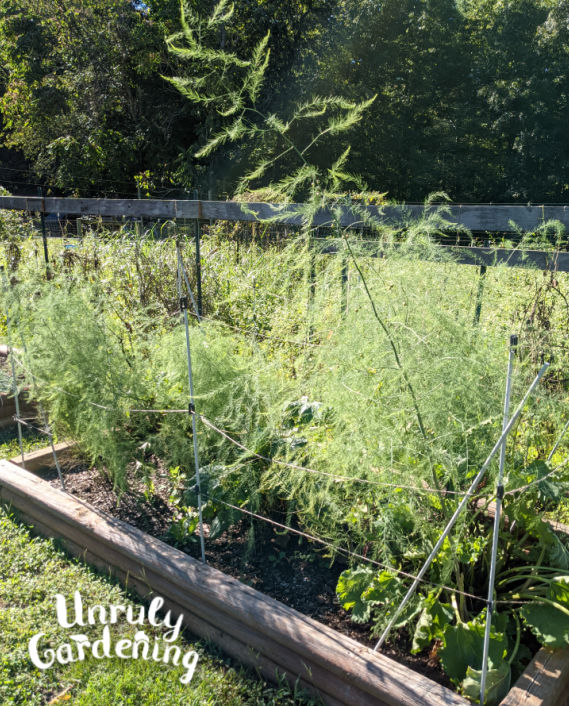
You can’t harvest any spears this year without damaging the plant’s productivity in the long run, so let those shoots grow up into ferns. The ferns this year will also be much larger than last year’s- still, avoid damaging them if at all possible.
Watering can be laxer this year- while it’s a good idea to water them (give about 1″ of water with each watering) in drought periods, and of course, offering an inch of water a week is something most plants would hardly turn down (and is recommended to provide for asparagus plants), you don’t need to worry about your plants dying on you if you let them dry out a bit.
Male & Female Plants
This year, you should be able to start telling your male and female plants apart from one another. They’re easy to tell apart: later in the season, females produce bright red (poisonous!) berries (seed pods), and the males do not. The blooms are also different, but you’d need a magnifying glass just to tell them apart, so it’s easiest simply to wait for berries to form.
Spotted asparagus beetles may appear with the berries. They do not damage the plant in the long run, but they do feed on the berries.
Male and female plants both produce delicious, edible spears. Male plants do produce larger and thicker spears, and more of them, than female plants. This is why sometimes you see ‘all male’ asparagus varieties: male plants are preferred by commercial growers for those larger spears.
Some gardeners remove female plants entirely. Sometimes it’s because of the lesser yields, sometimes it’s because the berries have a tendency to produce surprise volunteer asparagus plants. We keep our female plants. They may not be as big, or produce as many spears, but they still taste just as good!

Once again, in winter, remove spent foliage once completely dead. If mulching, top up and maintain mulch.
Third Year
Fertilizing
Apply compost tea in early spring every year, right as the spears are popping out of the ground.
First Harvest
If you so choose, you can begin taking a very small harvest this year. Some people prefer to wait another year to build up the crowns more, resulting in a stronger, longer-lived plant. If you do choose to harvest, don’t take too many spears and make sure to only harvest for a 2-week period before allowing the rest of the spears to grow out into ferns.
Harvest spears that are 4-6 inches or taller by cutting or snapping them at the soil line. Don’t harvest any taller than 10 inches- they’re probably not as tender and tasty at this point.

Care
If your asparagus plants dropped seeds last year, you might find some volunteer babies in the bed once spring rolls around. Transplant or weed out these seedlings so as not to negatively impact your existing crowns.
Other than that, continue caring for the plants as before. Don’t let them suffer through a month-long drought without offering some water once or twice (and ideally give them an inch of water a week), keep the beds weeded, and when winter arrives and the foliage dies cut back the dead foliage. Top up the mulch layer as needed.

Fourth Year and Beyond
The plants are now fully mature with strong crowns, and will have the same yearly care requirements from this point on.
Fertilize the bed annually as you did for the third year. Fertilizer will now be required yearly to replace the nutrients taken from the soil each growing season. If mulching, continue to maintain mulch levels as needed. Cut back the foliage every winter to help prevent overwintering asparagus beetles.
Check for signs of the asparagus beetle starting in early May- if you spot them, handpick the beetles off into soapy water to get rid of them. These pests can cause scarring and brown spots on spears, and can sometimes make spears curl instead of growing straight. They also can make your plants be at higher risk of fusarium wilt.
Keep the bed well-weeded, and provide regular water- yes, still about an inch a week, if you can manage it, but don’t stress if you have to skip some weeks. Remove any volunteer baby asparagus sprouts that pop up if you kept your female plants so their roots don’t interfere with existing plants.
Harvesting Asparagus
For the fourth year, you can harvest your asparagus patch for 4 weeks. For the fifth year and beyond, you can harvest for a full 8 weeks. (You can technically go ahead and harvest for 8 weeks in fourth year if you so desire, but if your plants aren’t quite up to the challenge yet, it can cripple them later in life. Patience and caution pays off, with asparagus!)
In spring, let the spears come up from out of the soil, and wait for them to grow to 6-10 inches tall. Check daily! Once they’re your preferred height, harvest them by snapping them off by hand or cutting the spears with a sharp knife. It’s best to do this in the morning or evening for optimal freshness and crispness.
Storing Homegrown Asparagus
Store harvested asparagus in a jar or cup in the refrigerator with the snapped/cut end in about an inch of water. Use while spears are crisp.
Only harvest spears that are larger than that of a pencil in diameter. Once this happens, or once you’ve harvested for the full 4-to-8 weeks, stop harvesting your asparagus and let the spears grow out into ferns. Any spears that are too hard to cut or snap are no good for eating- too tough! Don’t use those.
Additionally, any spears that have begun to open at the tip will have toughened too much to eat. The same usually goes for any spears that are taller than 10 inches.
Use your homegrown asparagus just like store-bought!
We especially love it grilled (here’s an easy grilled asparagus recipe from Cultured Table to try) or wrapped in bacon, then baked.
Yield
As a general rule of thumb, you can assume that a single healthy 5-year-old male plant continually harvested from for a full 8 weeks will produce approximately half a pound of spears a year- or roughly 20 spears per plant.
This number may change depending on the health of the plant, the variety, the nutrients (or lack of them) in the soil, and interference from too-close spacing or interloping weeds.
Of course, that’s the male plant; female plants can be expected to produce 1/2 or 1/3 the yield in the same conditions, since much of the plant’s energy goes to setting seed.
Those working with very small gardens or limited space would likely be better off ensuring they have only male plants in their patches, so as to make the most of the space they have to work with.
On the other hand, growers with the space to allow it may want to consider allowing some female plants to stay- they can produce young asparagus plants without the gardener needing to start them themselves, which can be moved and transplanted regularly to continually refresh the bed with young, new plants. Since spear yield decreases after 15 years, but it takes about 5 years for a plant to really get going, having a large selection of plants all of varying age can help to extend the use and lifespan of a patch significantly.
[print-me target=”body”/]

Thank you! As a home gardener new to growing asparagus, this is exactly the information I was looking for. Happy Gardening 😊
Hi Dorian, I’m so happy you found the information on growing asparagus helpful! Happy Gardening to you too! 🙂
Hello, nice info thank you. I’m Growing asparagus from seed here, 80% germination duchess, more might pop up yet maybe, I planted them 1 month ago. At the moment the seedlings are inside on a bright windowsill, with tendency to dry out. In your opinion is it safe to bring them outside to the Polytunnel now? We still have risk of frosts here in the south of Ireland (but generally doesn’t freeze things in the tunnel).
Hi Mark! They will probably be okay in a polytunnel where they’re protected from frosts.
They’re surprisingly hardy seedlings!
One year we had far too many to plant right away, so I tucked a bunch of the extras in a bucket, stuck it on the porch, and only occasionally remembered to water them.
I ended up planting them in a free garden spot months later & many of them still survived, even with all of my neglect.
Love the article! I planted about 20 or so seedlings but doubled up in each cell. They are growing great but I’m worried that their root systems are going to be tied together. Is it better to try and separate them or plant the two seedlings together into the garden when ready to transplant? Thank you!
Hi Alex, Yes, you’re exactly right! You’ll want to separate them and let each seedling/plant have their own spot in the garden.
So glad to hear you liked the article! Happy Gardening!
Hi, I am glad I found this article. I planted aspharagus seeds in small cell packs and now I’m afraid it will not be sufficient for their roots. They’re growing like grass and I’m wondering if that’s how it should be. And, should I thinned it out and only leave one plant in each cell pack? Or should I transplant in a larger container until time to plant outside. Thank you.
Hi Loveena! One seed will put up several little shoots, so it sounds like they’re doing right.
Once they’re a little bigger & you can tell the plants apart, if you have the space for the extra trays, you could definitely up-pot them to larger containers.
Asparagus isn’t too fussy, but they will enjoy the extra room to grow.
So proud of myself! 3 years ago I planted 60 asparagus seeds in a raised bed. They all grew marvelous. The first year they appeared to winter quite well. I spring weeded them this morning. I have clumps of 6 male spears coming in spots now. Truly Amazing! Anxious to see how many clumps of male seeds I have.
Hooray!! It’s amazing how a handful of seeds can provide so much asparagus to enjoy over the years!
Happy harvesting!