
Elderberries: How to Harvest, Preserve & Use (+Free Printable Cheat Sheet!)
Learn how to harvest, store, freeze, and dry elderberries, then how to turn them into healthy syrup, tea, vinegar, oxymel, and more!
July 2023 update: I’ve also made a free printable “cheat sheet” of Elderberry Remedies & Recipes that you can grab below. (No signup required!)

Have a bounty of elderberries and not quite sure what to do with them?
We have lots of ideas for you!
RELATED ARTICLE: How to Grow Elderberry from Cuttings

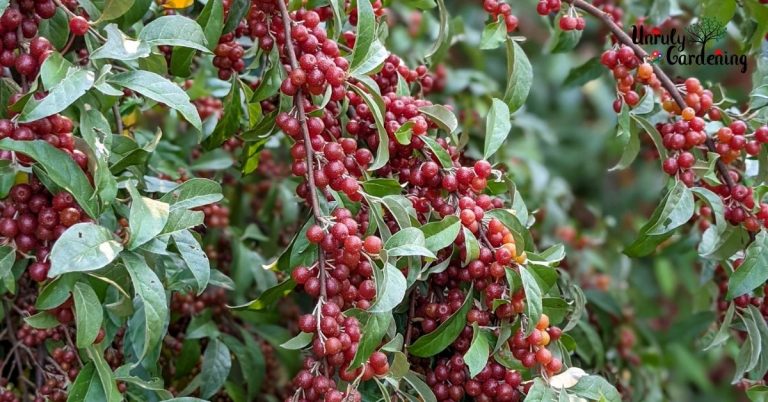
I’m using Black Elderberry (Sambucus nigra, S. nigra ssp. canadensis ) in these photos, since that’s what we have growing around here. Blue elderberries (Sambucus cerulea) can be used in the same way in these recipes.
First, make sure you harvest fully ripe berries.
When to Harvest Elderberries
Black elderberries are ready to harvest when the berries have turned a deep black color; the cluster also start to heavily droop downward.
The berries don’t all ripen at the same time, so you’ll notice some clusters of berries are black, or reddish-purple-black, while other clusters are red, and some are still green.
Don’t harvest or eat the green or red berries! Leave them on the elder bush to continue ripening.
Below is a photo showing elderberries at different stages. You can see the green and red ones aren’t ready to harvest, while the black ones are. There are also a few clusters that have shriveled up and dried on the vine – leave those and don’t use in your remedies, they aren’t at their prime and likely have mold starting to develop.

The trickiest ones are the reddish-purple ones that are *almost* ready; I know some people (including some of my family members who help me pick!) go ahead and pick them along with the black berries, but I personally like to leave those another day or two, until they’re a deeper black color.
How Long to Refrigerate Elderberries
The easiest way (and the most short-term way) to store elderberries is by simply popping them in the refrigerator.
Using either whole clusters or the plucked, stemless berries, simply place the unwashed berries in a container, cover the container loosely, and store in the refrigerator.
Try to use your fresh berries within 1 to 2 days – they can mold and/or start fermenting very quickly!
This storage method is useful for if you picked your elderberries one day with, say, the intention of making syrup, but decide that you would rather make the syrup the next day, instead of on the day of picking.

Freezing Elderberries
Freezing is a longer-term way to preserve your elderberries.
Taking a cookie sheet pan, cover it with parchment paper. You can either place entire clusters of fruit onto the pan, stems clipped close to the head and placed, stem-side-up, on the parchment paper, or you can go ahead and remove the berries from the stem, spreading them out as a single layer on the parchment.
Pop this in the freezer for several hours or overnight. They will be solid enough to put away.
For elderberries you left the stems on, use this time to de-stem the berries, collecting them in a separate container and discarding the stems. Store the berries in freezer bags or freezer-safe containers. Sealing them with a vacuum sealer will help to prolong their freezer life even further.
Frozen elderberries are generally good 6-10 months, but may be good for as long as a year. This method is a great way to store elderberries (and destem elderberries with minimal fuss!) for making jelly or syrup later in the year, when elderberries are not available.

Drying Elderberries
Dried elderberries are helpful to have on hand year round. Once completely dried, they have a shelf life of around 1 year, or as long as they smell good and aren’t faded.
To dry the berries in a dry climate, you can use screens. (Highly humidity climates may find they mold or ferment too easily this way.)
To dry elderberries on a screen, spread the berries in a single layer over screens, stirring with a clean hand a couple times a day. Depending on your climate and temperature in your house this could take several days to a week.

We’ve found that a dehydrator works great for our humid summers. We use a hand-me-down old Nesco dehydrator set at 125 degrees F, lining the trays with parchment paper so the berries don’t fall through.
You can start checking your berries after about 6 hours in the dehydrator and stir every so often, but ours usually takes overnight, or around 12 to 14 hours to completely dry.
Once completely dry, store in a glass jar out of the light, with a tight-sealing lid.

Tips for Using Elderberries in Recipes & Remedies
Elderberries can be used fresh or dried. There’s some conflicting opinions about using them raw or cooked. Cooking is said to reduce the toxins in the seeds and is what most herbalists seem to prefer, while those in the raw camp believe heat destroys the medicinal benefits.
- The toxic elements in the seeds become a problem when crushed. If you simmer the whole berries, or infuse the whole raw berries in vinegar or alcohol, and don’t crush the seeds, the mixture is fine to use. Just be sure to strain out the seeds before consuming.
- Eating a whole berry with an uncrushed seed will likely pass right through you (but still not recommended!) Chewing or pulverizing the berries so the seeds break open, are not good things to do.
- If a couple small stems are left with the elderberries, it will be okay. Try to get as many as possible, but if you miss one or two, it’s fine. It’s not okay to leave the stems on all or most of the berries.
- If you’re concerned about getting an upset stomach from raw elderberries, just heat or cook them first for at least ten to twenty minutes. (And don’t forget to strain out the seeds!)

FREE Elderberry Remedies & Recipes Printable
We’ve made this free elderberry cheat sheet that you can grab and print out, or save to reference when you’re making things with elderberries!
Just click on the thumbnail above and the pdf file should automatically open (unless you have super strict browser settings, then you may need to try another browser.)
There’s no signup required, no strings attached, and feel free to share with your friends and family. 🙂

1. Elderberry Vinegar
Elderberry vinegar may sound like a strange thing to make, but you can use it to make (among other things) delicious honey-caramel candies! You can also often use it in recipes that normally call for fruit or balsamic vinegar. So why not try making a jar, just to experiment with?
To make elderberry vinegar:
Dried or fresh elderberries are poured to partially fill a glass mason or canning jar (half-way with fresh elderberries, one-fourth way with dried berries), then apple-cider vinegar is used to top it up. Cover with a plastic lid (metal will rust!), let it steep for 1-4 weeks in the refrigerator, and strain; you’ve got a jar of elderberry vinegar!
Elderberry vinegar is good for 3 or 4 months when kept in the refrigerator, or you can process in a water bath canner for 10 minutes for longer shelf life.

2. Elderberry Syrup
Elderberry syrup might seem scary, but it’s actually an easy, minimal-fuss project that you can make in an afternoon!
Elderberries are destemmed and covered with water, and simmered for a short while, sometimes with a stick of cinnamon or a small slice of ginger. The fruit gets smashed gently around a bit with a fork to release the dark, rich juices, and after gentle heating, it goes through a strainer, the seeds and pulp discarded, and a mess of golden, sweet raw honey gets mixed in with the lot.
Elderberry syrup should be stored in the refrigerator for about a month. Find the full recipe at our other site, The Nerdy Farm Wife.

3. Elderberry Tincture
Elderberry tincture can be made with dry or fresh berries, so you can make it year-round as you need it! This is a slower project, as it needs 4-6 weeks to infuse, but once it’s made, it’s good for a whole year, or sometimes even longer!
A jar is partially filled with dried or fresh elderberries (1/4 way with dried, 1/2 way with fresh berries), then it’s filled the rest of the way with high proof alcohol. Then the lid is secured, a label gets slapped onto the jar, and the tincture gets hidden away somewhere dark to infuse for about 4 weeks! After that, it’s just a matter of straining out the elderberries, and bottling your new tincture into glass jars or bottles, and storing in a cool, dark location for best shelf life.
A few drops are all that’s used at a time- dropped into your favorite drink, or in a spoonful of honey- so one batch of tincture is probably all you need for the year!
Video: Elderberry Slideshow
Here’s a slideshow summarizing this article.(Sometimes an ad plays first, but the video will start right after! The video player won’t show up if you have an adblocker.)
4. Elderberry Tea
Elderberry tea couldn’t be simpler- it’s just dried elderberries, water, and your choice of sweetener, if so desired.
Take 1 to 2 tsp of dried elderberries to every 8 oz of boiling water, and steep for at least 10 minutes before straining, sweetening (if that’s how you drink your tea), and drinking.
5. Elderberry Oxymel
Oxymels are sweet and sour medicinal syrups, made with herb infused apple cider vinegar and honey.
We’re going to make a hot oxymel – which means the elderberries will get heated with vinegar before being combined with honey.
To make elderberry oxymel:
Simmer 1/4 cup dried or fresh elderberries and 1/2 cup vinegar in a small saucepan for about ten minutes. Be sure to cover with a lid as it lightly simmers (but doesn’t boil), since vinegar fumes can be quite pungent!
Remove from heat and let cool to lukewarm or a temperature that’s easy for you to handle.
Strain and combine the still-warm elderberry infused vinegar with an equal amount of honey. Taste the oxymel. It will be quite tangy, so if you want a sweeter mixture, just keep adding more honey until it has a taste that’s pleasant to you.
Store in a glass canning jar with a plastic lid (metal lids will rust over time due to the vinegar’s acidity.)
Take by the spoonful as needed for sore throats and minor colds and flu. The shelf life of oxymels is somewhere around 9 months.
6. Elderberry Lip Balm
Here’s a fun project idea – use the dried berries in your lip balm!
This lip balm is also infused with alkanet root and flavored with peppermint essential oil. You can find the full recipe at our other site, The Nerdy Farm Wife.
Bonus Idea: Elder Leaf Salve
The leaves are useful too! We make a salve with the leaves (for bumps & bruises).
Our articles are for information and idea-sharing only. While we aim for 100% accuracy, it is solely up to the reader to provide proper identification. Be sure to seek out local foraging classes and plant walks, and invest in mushroom and foraging guides suitable for the area you live in, since some wild foods are poisonous, or may have adverse effect.
[print-me target=”body”/]


Hi for drying berries if don’t have screen will any finer mesh container do
Hi Kelly! That might work if there’s a lot of good air flow & low humidity, but you may have better luck drying in the oven instead.
A Farm Girl in the Making has good directions for that:
https://afarmgirlinthemaking.com/how-to-dry-elderberries-and-store-for-long-term-storage/
After cooking and straining the pulp for jelly, can the pulp and/or seeds be used in fruit leather? I understand the seeds have toxicity but also hear that the heat reduces greatly or deactivates the toxins. would it be possible or worthwhile to either strain the pulp and remove the seeds and make a mixed fruit leather, or IF enough toxicity is killed could you just use a food processor with the pulp and seeds and process to a fine mixture and make fruit leather. Fruit leather is just a thought but I would think drying it would make it good for that or tea maybe?
Hi Hiram! Although the toxicity of the seeds are reduced with cooking, there’s not really any benefit to including them.
We follow what Richo Cech recommends in his book, Making Plant Medicine, to remove the seeds since they have no medicinal benefit, and that way there’s no potential risk from them.
If you could separate the cooked pulp from the seeds however, then fruit leather might be a good option!
If you give a try, let us know how it goes!
I ended up using a emulsion blender and used it to make syrup. I figured they would be heat treated and safe to make jam but ended up making syrup instead. Do you think it’s ok? It cooked for an hour and sieved twice
Hi Kathleen! I am extremely cautious about ingesting anything elderberry with crushed seeds.
If the seeds stayed whole & are then strained (like they do in a tincture), that would be one thing, but if the seeds got pulverized & broken open so the toxic compounds could seep into the juice, then I personally wouldn’t want to use it internally.
Hello
Thanks for this wonderful article. So many brilliant ideas and so well explained.
I find elderberries so beautiful but I didn’t know what to do with them.
Hi Maria, I’m so glad you found the article helpful!
I’m curious, do you have Sambucus Nigra (European Elder) or Sambucus canadenesis (American Elder)?
Hi Chris! It’s been so long since we bought them that I’m not sure of the specific varieties, but my best guess is that we have Sambucus nigra ssp. canadensis – American elderberry.
Hi! Some friends let me come and harvest elderberries from their bush that produced berries fro the first time. They looked pretty dark blue but after dehydrating they are kind of a dark reddish brown color. Does this mean they weren’t quite ripe when I picked them? And can I still use them medicinally.
Thank you
Latifa
Hi Latifa! We only have black elderberries, so I’m not quite sure how blue elderberries look when dry.
Grow Forage Cook Ferment is a good site for info on blue elderberries – here’s their photo of dried blue elderberries:
https://www.growforagecookferment.com/wp-content/uploads/2015/08/dried-elderberries-1024×997.jpg
from this article:
https://www.growforagecookferment.com/foraging-for-elderberries/
It does look like some have turned reddish brown for them too – perhaps those had already started drying on the vine & got a little overdried??
I suspect they’re fine to use, but I’m just not familiar enough with blue to give a solid answer. I wish I could be more help! ❤
How come cannot use SureJel method with elderberries. It’s not listed on SureJel pkg instructions.
Hi Mary! I recently read this information from the University of Wisconsin about using elderberries in jelly:
https://fyi.extension.wisc.edu/safefood/2020/06/05/elderberries-beautiful-to-look-at-not-for-canning/
They have some pretty specific instructions to follow if you want to make elderberry jelly, otherwise, it may be unsafe.
For example, you need to have a certain amount of sugar:juice ratio and you can’t use low sugar pectin, or honey as a sweetener.
It’s a great read, so definitely check it out! 🙂
Is it possible to water bath can elderberry syrup for long term storage? Or pressure can?
Hi Lora! My understanding is that newer research has shown that elderberries have too low of a pH to safely can their products (other than a very precise jelly method, using weight), so now we usually freeze the berries & make batches of syrup fresh throughout the winter.
Here’s a good article detailing the info on elderberries:
https://extension.psu.edu/why-some-old-canning-recipes-are-no-longer-safe
and the jelly guidelines:
https://fyi.extension.wisc.edu/safefood/2020/06/05/elderberries-beautiful-to-look-at-not-for-canning/
Hi, I’ve made many tinctures and a few weeks ago decided to have try elderberry. I dried the bunches, then put them into the alcohol. I’m reading now that the stems are toxic. I usually strain the herbs I use through cheesecloth. If I just pour off the liquid without pressing, would that be safe to use?
Thanks in advance,
Sarah.
Hi Sarah! The stem contains toxic compounds, so other than the occasional tiny bit of stem that sneaks past attached to a berry, it’s not a good idea to have them in your tincture.
Unfortunately, I would personally discard this batch, since it might make you feel sick.
What is the minimum cook time for dried berries to make sure it is not toxic anymore? Im afraid of under cooking to make a syrup
Hi Juan! We cook all elderberry forms at least 10 to 20 minutes. 🙂