Harvesting & Storing Homegrown Potatoes
Learn when and how to harvest both new potatoes and storage potatoes, plus how to store them for a longer shelf life!

You’ve sprouted your potatoes, planted them in the ground, hilled them up, and now they’re growing- but how do you tell when it’s time to harvest them?
Don’t worry, we’ve got you covered! In this post, we’ll not only tell you how to find out when it’s time to harvest both new potatoes and storage potatoes, but also tell you how to store them for the best shelf life!
New Potatoes?
First off, let’s start by answering a question you may be asking: what are new potatoes?
New potatoes are simply potatoes harvested in an earlier growth stage, before the plants have fully matured. They are used directly from the ground, uncured. They are easy to harvest in the home garden, but have thin fragile skins and don’t last long once dug up.

Sometimes red potatoes and new potatoes are confused for each other. New potatoes are strictly potatoes that have been harvested from the plants before they’ve reached full maturity. Red potatoes are a variety of potato, though it’s certainty possible to harvest them as ‘new’, just like other varieties.
Of course, when you harvest a new potato, you’re sacrificing the chance to harvest it as a mature potato. However, they’re also available much earlier in the year. You’ll have to decide if the trade-off is worth it!
When & How to Harvest
New Potatoes
New potatoes are usually ready to begin harvesting around 55 days after planting, or when flowering has begun. To harvest, very carefully use a garden fork to lift a plant. You’ll see small potatoes attached to the plant- break the connection, and you’ve harvested a new potato!
Once you’ve pulled the potatoes you want from a plant though, it’s hard to replant it so that it keeps growing and producing. This is why we only harvest a few new potatoes each season, and wait for most of the plants to fully mature.

Fully Grown Potatoes
Now, for the more common way to harvest potatoes – at full maturity, where you may hear them being called ‘storage potatoes’ or ‘main crop’ potatoes.
To harvest your potatoes at this stage, you’ll be waiting for the above-ground plants to completely die. They’ll go yellow and fade, then turn brown and wither up – once you have what looks to be a dead plant sticking up out the ground, your potatoes are ready to harvest!
Once the above-ground plant has died, you’ll want to harvest your potatoes relatively quickly. Leaving them in the ground for much longer is likely to result in rot. You’ll also want to avoid letting them get hit by a hard frost – while they can tolerate a light one, hard frosts can kill the plants and potentially end up causing rot.
Being very careful and starting out a good distance from the plant, use a shovel or garden fork to lever it out the ground. Try not to impale or cut into a potato as you do so, but it happens. Damaged potatoes are on a timer from the moment you break their skin, and need to be used up fairly quickly instead of storing for a long time.
How to Store Homegrown Potatoes
New Potatoes
When you bring in your new potatoes, it should ideally be very close to when you want to use them. They have a short shelf life, compared to their mature counterparts.
No matter what you do, new potatoes, once harvested, don’t last that long at room temperature. As their skins are so fragile and easy to break, they should not be washed until right before you’re ready to use them.
If you have to wait for a while before using your new potatoes, store them in a cool, dry, dark location, such as a storeroom. They will have dirt on them – do not remove this before placing in the storage location.
Place new potatoes slightly apart from one another, ideally allowing for good air circulation. When you’re ready to use them, wash clean of dirt. Prepare & cook immediately afterwards.

Storage Potatoes
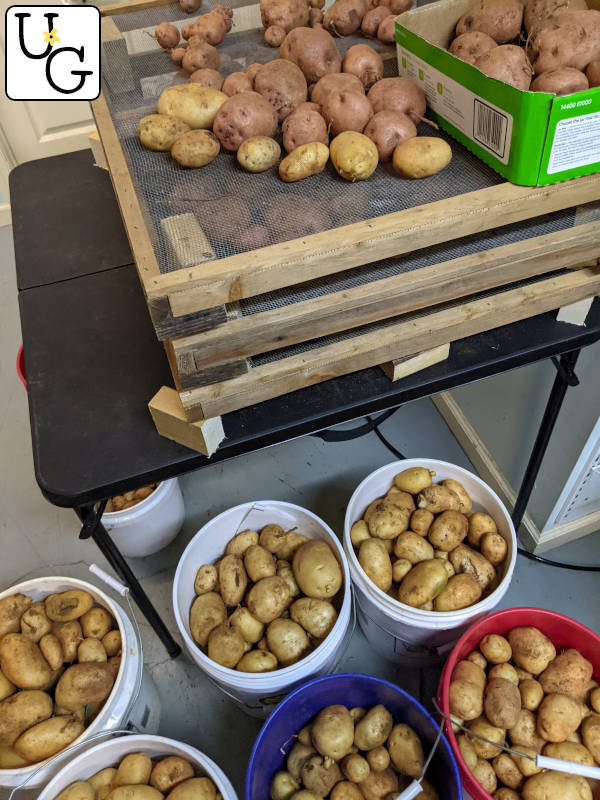
Potatoes need to cure for two weeks after harvesting in order to have their best shelf life. Go through your potatoes, dividing out any damaged ones and setting them to the side to use up in the next couple weeks.
Brush the soil off the good potatoes, but do not wash them! Washing them will encourage molding, and reduce shelf life.
Set the potatoes in a place with good air circulation – we use our homemade racks made with old pallets – in a location that stays constantly dark, and between 45-60 F for 2 weeks. This will harden the skins and seal minor potato injuries.
To keep temperature cool enough in our storeroom for potatoes, we use a portable air conditioning floor unit. Be aware that while this does help extend shelf life of our potatoes, it also adds to the electric bill.
Remove and discard any molding or rotting potatoes you see. After these two weeks, simply use potatoes as you would any potato you bought from the grocery store. Wash potatoes only right before you plan to use them.
Store potatoes in a cool, dark location with good air circulation, well away from any onions, garlic, apples, pears, or bananas, or any stored fruit in general. Those produce items can speed sprouting, and thus, spoiling, in potatoes.
Storage potatoes usually last around 2-4 months before beginning to sprout, depending on variety. Potato sprouts should not be eaten, and can be toxic. Throw out sprouted potatoes as you notice them.

Other Ways to Store Potatoes
You don’t only have to store potatoes by keeping the whole tuber in your storeroom! There’s a number of different things you can do with your homegrown potatoes. Some of them even can increase their shelf life!
(Look for some individual tutorials on making these following ideas, hopefully coming to our blog this summer!)
You can use a dehydrator to make dried potato flakes, homemade dried instant mashed potatoes, and dehydrated potato slices.
Alternatively, you could look to your freezer, and make up batches of homemade hashbrowns, tater tots, or fries, freezing them to use later.
Finally, if you’re an avid canner, you can pressure-can homegrown potatoes! This significantly increases their shelf-life. Home-canned potatoes can last a year on your storeroom shelves.

More Potato Posts
Here are the first two potato growing articles in this series, in case you missed seeing them: