How to Grow Peppers from Seed
Learn how to grow and care for peppers planted from seed!

About Peppers
Whether they’re big, glossy bell peppers, unique heirloom sweet peppers, or bright and fiery hot peppers, they all start the same way: as a little seed, tucked up all warm and cozy in a bed of soil.
All peppers require a bit of patience, when it comes to harvesting: they take their sweet time about it, first growing plenty of foliage, then blooming, then setting fruit. And oh, how waiting for those fruits to turn color can be torture to the eager gardener!
Despite the wait, growing peppers from seed can be incredibly satisfying. Growing from seed means you’ll have access to varieties you simply can’t find plants of in garden centers.
Have you ever wanted to make your own paprika powder? You can easily do so simply by growing the seeds of a paprika pepper! (And, hey, if you’re interested, we’ve got an article on how to grow and make your own paprika powder right HERE!)
All you really need to grow yourself a batch of peppers is plenty of sun, heat, a decent amount of water, and a healthy helping of compost (plus a little sprinkle of granular and liquid fertilizer– peppers like to be spoiled a bit).
A garden is optional! Peppers can grow just fine in pots, if your space is at a premium.
And, of course, you’ll need seeds and soil. Can’t really grow anything without them!

Sowing
When sowing seeds, you’ll have the best results by using fresh seed meant for growing this current year. Peppers, in particular, may simply refuse to grow after being kept for a couple of years. Five-year-old pepper seeds probably won’t give you a huge flush of healthy seedlings. Ten-year-old pepper seeds likely won’t germinate at all!
We’ve found that we can use a packet of pepper seeds for 2-3 years after it’s purchased, but once it hits the 4-5 year mark, the seeds stop performing as well. If your seeds simply refuse to germinate no matter what you do, check the date- they might just be too old.
Deciding when to plant
General advice is to start sweet/bell peppers 8-10 weeks before your estimated final frost date, and to start hot peppers 10-12 weeks before your estimated final frost date.
Hot peppers germinate and grow very slowly, so a little extra time helps them get a bit more size to them before it’s time to go out to the garden.

How long until they sprout?
Hot peppers take longer to germinate than sweet and bell peppers, as a general habit. Additionally, if they’re not provided with plenty of heat, even sweet/bell peppers can take a long time to come up!
The ideal soil heat, which results in quickest germination, is 75-80 F. This is why many people invest in a heat mat for seed starting, because that’s just too hot to keep a room at during winter and early spring, for a lot of us! At these temperatures, you can expect to see sprouts as soon as 4-7 days of sowing. Hot peppers can take longer- but even then, they’ll probably germinate in around 14 days or so. That’s fast!
Cooler temperatures will result in slower germination. Much, much cooler temperatures- say, the sort that you’d find in a cold basement- may result in seeds not germinating at all!
Assuming you are not growing seeds in a cold basement, but don’t have a heat mat to start your seeds upon, you can probably expect your sweet/bell peppers to germinate anywhere between 7-20-ish days, and your hot peppers to germinate somewhere around 14-30 days. The hotter the pepper, the longer it seems to take to germinate.
If you’re growing an extremely hot pepper- such as Bhut Jolokia- be aware that the seeds can potentially take weeks to germinate. If you see no signs of germination even after 30 days, don’t give up quite yet- give them at least 6 weeks of hot, moist conditions, just in case. Still don’t seem to be sprouting? Try again with fresh seed.

How to start the seeds
Start by filling up containers, plant cells, or trays with potting soil, or using a soil blocker to form as many blocks as you would like to have plants. Thoroughly wet the soil in your containers/plant cells/trays, letting excess water drain out through drainage holes in the bottom. You want the soil to be evenly moist, not a bog!
You may wish to use a seed starting mix, but we have excellent results using FoxFarm’s Ocean Forest Potting Soil for growing beautiful and healthy peppers and tomatoes. The choice is yours!

Once the soil’s moistened and the excess water’s drained away, plant the seeds. Because germination can be spotty, especially with hot peppers, it’s a good idea to place 2 or 3 seeds for every plant you’d like to have.
Sow the seeds 1/4 of an inch deep. This means you can either tuck the seeds under the soil, nudging and gently pressing the wet soil over top the seed, or you can place the seeds on top of the soil in your containers, and then cover them after you’re done with a layer of set-aside potting soil, using your fingers afterwards to gently tamp everything down. Up to you!
Now, cover the tray/container with a greenhouse top or layer of plastic wrap, in order to help trap in humidity and heat. Place the tray under grow lights, and on top of a heat mat, if you have/want to use one.
Keep seeds evenly moist and warm until germination occurs.
Tending Sprouts
Once the sprouts emerge, you can remove the greenhouse top/plastic wrap.
If you are using grow lights, situate the tray/container(s) so that the seedlings are about 1 inch below the lights. Continually adjust the plant and light height so that they stay 1 inch away whenever possible: this encourages plants to stay short, stocky, and ultimately, more healthy, as plants that grow tall and spindly from reaching for light are often weak and can snap easily.
After they’ve grown a bit, and have a few true leaves, you’ll need to transplant them to larger containers.

Transplanting
Peppers need plenty of space to grow! Once they’ve gotten a few true leaves- not the little ones that first appeared from the seed, but the ones that form and grow after- it’s time to give them their own space!
Untangle the seedlings from each other best you can, and tuck them each into their own, larger container, pot, or plant cell, with fresh potting soil. If the plant was the only one in its previous container or cell, then you can don’t have to untangle anything. Just tuck the plant into its new pot.
Immediately after transplanting, give each plant a good soaking of water. Give them a day’s break from the light and any stressors to recover.
Odds are, they’re going to throw a bit of a tantrum about this, getting all sad and wilty and sullen. Don’t worry- you haven’t killed your plants! They should perk right back up by tomorrow morning, and they’ll be ready to go back under the lights and keep on growing!

Further care
You might have to transplant the peppers one more time as they grow. Avoid letting them get rootbound! It’s better to transplant again than to let the roots get all tangled like that. Rootbound plants may not produce as well.
Water the soil when it gets dry. Avoid swampy soil! Standing water can lead to rot.
Keep adjusting the plants and lights as the plants grow. Keeping a light fan blowing on the plants can make them hardier, as it simulates a breeze. It also helps with air circulation, which is always good to have with plants!
Finally, you’ll likely have to fertilize your peppers at least once as they grow. Richer potting soils can sometimes sidestep this requirement, but others cannot. Odds are, the deficiency in question is going to be a lack of nitrogen, shown by leaves becoming rather more yellow than green. Fix this with a nice dose of liquid fertilizer, such as fish emulsion!

Care for Final Transplant into Garden
Only plant your peppers outside after absolutely all risk of frost is completely passed, and the weather has begun to warm up.
First, of course, you’ll need to harden off the plants! Place the seedlings outside in a protected area every day, starting off in a place that starts out shaded but gets some indirect light. Bring them back in every night. Bit by bit over the days, gradually expose them to direct sun. This goes on for a week or two, acclimating the plants to life outdoors.
Once acclimated, it’s time to plant!
Planting
In a pot
Choose a large pot, and fill it with rich soil. A bit of granular fertilizer and a generous mixing-in of compost wouldn’t be amiss.
Put one pepper plant per pot, and water well. Pots dry out swifter than plants in the ground, so expect to have to water frequently, whenever the soil dries out. Regular fertilizing may be required. Keep an eye on the color of your leaves- they’ll tell you when your plant needs feeding!
Refrain from fertilizing during flowering. Excessive fertilizer may cause flowers to fall off the plants.
In the ground
Dig a good hole, and mix in a generous amount of compost. We add a scoop of granular fertilizer, too. Plant the pepper in this hole, watering it well. It will wilt and look very sad for a day or so- a dose of liquid fertilizer may be needed to help it perk up and take off.
Space plants 18-24″ apart from each other. If you have a surprise cold night, cover the plants with something like a blanket to protect them. Be careful not to snap any stems!
Cutworms are menaces on pepper plants. If they’re a problem where you live, a twig stuck in the ground, flush with the base of the plant, can save your plants from falling victim.

Care
After a month or so from planting, you might want to mulch around the base of your plants to help with water retention.
Blossom-end rot is one problem you might run into. It’s more common on tomatoes than peppers, but it means the same thing for both- not enough calcium, or the watering pattern’s gone just too wonky for the plant to deal with. Even out the watering schedule or supply calcium as needed.
Much of the care peppers require comes down to simply keeping their beds weeded. And, of course, waiting!
Some bell peppers, or peppers that bear heavily compared to the size of the plant, may require some supportive structure. Failing to provide this structure on such plants can sometimes lead to snapped limbs.
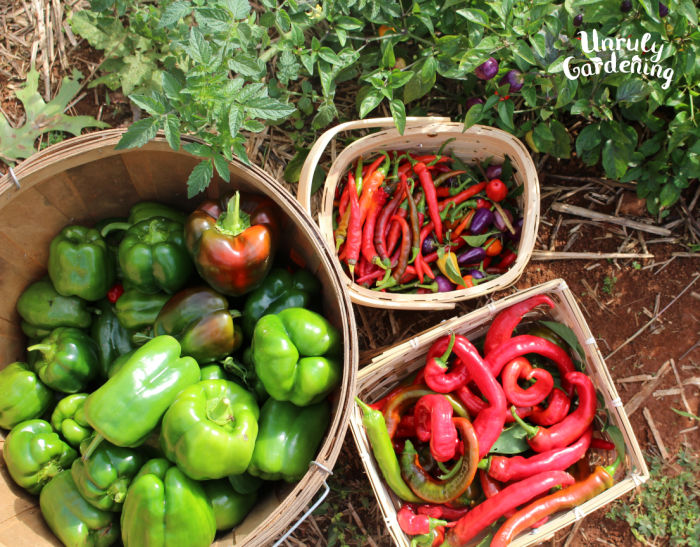
Sweet and bell peppers can be harvested when green, but are often considered to have an improved flavor if allowed to develop to full maturity and color. Hot peppers should be picked once color is fully developed.

The weight of a basket full of bell peppers on the arm is a heavy, delightful thing. And while hot peppers might be much lighter, a basket full to overflowing with their bright riot of colors is just as satisfying!
So with that thought, why not tuck a few pepper plants in your garden this year?