
Black Pansy Jelly
Learn how to turn black pansy flowers into a beautiful jelly. The flavor is light and mildly grape-like! (You can also use this same recipe with any other kind and color of pansy flowers!)

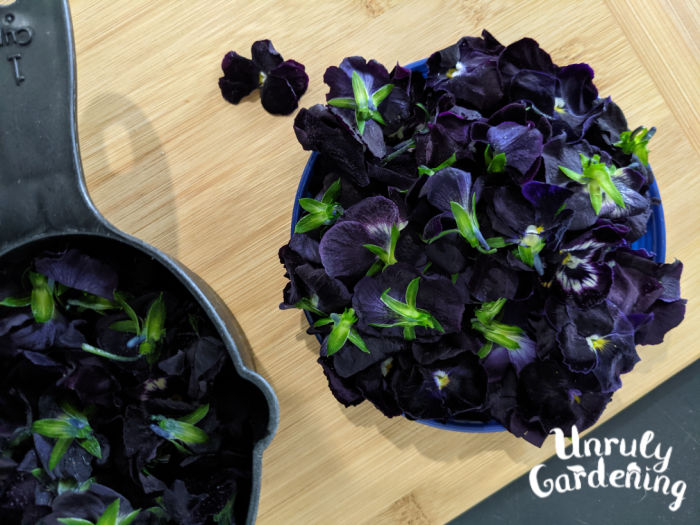
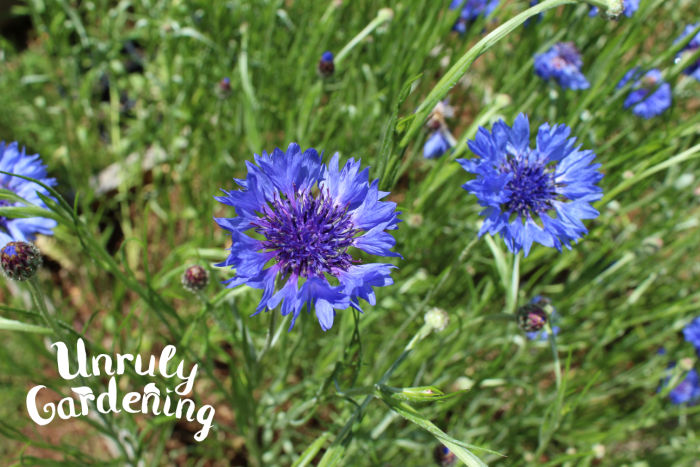
Black pansy flowers are just like other pansies, only they’re a very dark purple – so dark that they can appear black, sometimes.
Side Note: We’ve found that some seed sellers tend to photoshop pictures of black pansies so they look darker/blacker than they really grow, so don’t be surprised if you grow them for the first time, and see more purple tones than you were expecting.
The flowers have natural color variations, but be assured that they all share the ability to be used in this recipe.
Don’t have black pansies at home, but want to grow your own?
Check out our article:
How to Grow Pansies & Violas from Seed

Collecting the flowers
The more black pansy plants you have in your garden, the quicker you’ll get enough to make your jelly. You want 3 cups of black pansies, very loosely heaped, so if you’ve got the space, a mass planting might be a good idea!
In order to collect enough flowers without them drying up or going bad, we’re going to freeze them. Choose a freezer-safe container with a firmly securing lid– don’t use a freezer bag! The flowers are too easily crushed in baggies, and we want them to stay as whole as possible.
Collect your pansies as they open, tucking the blooms away in your freezer-safe container as soon as possible to prevent crushing. Don’t pack them down- just let them tumble down in there from your hand. Place the container in the freezer, and don’t remove it for longer than it takes to add the new flowers – the pansies are very thin and small, and they thaw fast!

Try to make sure the majority of your flowers are the deepest, darkest color possible. A small handful of flowers that have a little bit of white or purple are okay, but try not to have them be the majority. Avoid using those that are entirely a different color with no traces of purple or black, such as all-yellow or white flowers.
No need to take the petals off of these: just collect the entire flower head, breaking the stem off right behind the base of the flower.
Frozen flowers are good for months, so don’t worry if this seems to be taking a long time- it took us weeks of collecting to get enough flowers.
Once you have enough flowers, move on to making an infusion!
What variety to use?
We made this recipe with Black King pansies, making sure most of the flowers we collected were dark and as close to black as possible. Black King pansies are a very, very dark purple, which makes them look black in certain lights – but sometimes the flowers can be more purple than black. Feel free to swap in another variety of black pansy – the color may vary somewhat, but the basic recipe will work the same.
Making a Infusion/Black Pansy Tea
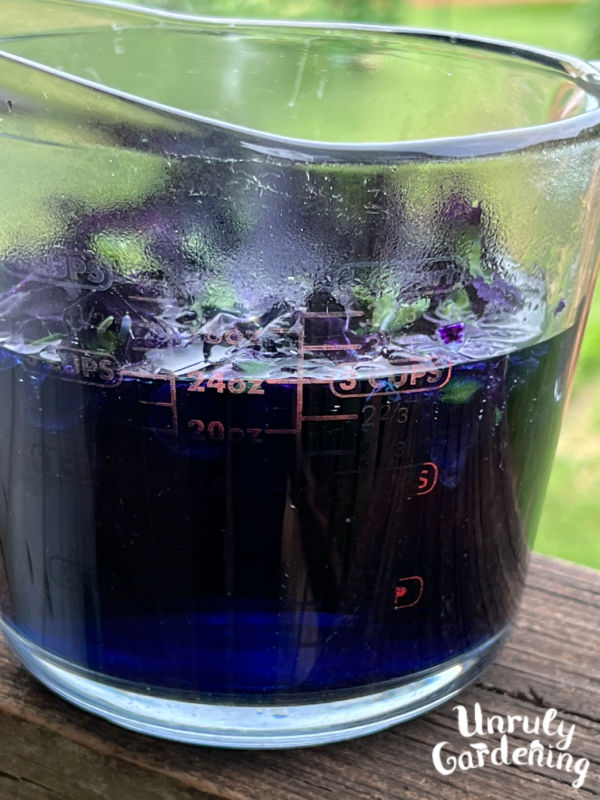
We make this infusion super-concentrated in order to get a dark, deep color in our finished jelly- this can take a while to collect, but oh, is that color worth it!
You will need:
- 3 cups loosely heaped frozen black pansy flowers (don’t pack them down!)
- 3 cups boiling water
- A strainer
- A heatproof container with enough volume to hold both flowers and water
- Place your pansies into a heatproof container.
- As they are frozen, don’t be alarmed if they wilt a bit: just measure quickly, before they can droop, and set aside.
- Heat the 3 cups of water to boiling, and pour over the pansies.
- Cover loosely, and leave to steep for 20 minutes.
- After 20 minutes, strain.
- Use your fingers to squeeze out any tea from the flowers before discarding the plant matter, keeping the tea.
- Bask in that gorgeous color! You should end up with approximately 2 1/2 cups of tea in total.
Flavor & Taste Note!
The flower tea has a wintergreen-like scent and the taste isn’t great. Don’t worry! Once you add lemon juice, sugar, and cook it – the tea will transform into a yummy and better smelling treat!
If making your jelly immediately, proceed to the next section.
If you’d rather make your jelly later, you can freeze this tea.
To freeze infusions for flower jelly:
Pour it into a freezer-safe container, seal the lid tightly, and place in freezer until solid. Tea may be kept frozen for 3 to 6 months.

How to make Black Pansy Jelly
Ingredients
- 2 1/2 cups of black pansy tea
- 2 tablespoons lemon juice (about the juice contained in 1 medium-large lemon)
- 1 pack Sure Jell low or no sugar powdered pectin (1.75 oz pink box)
- 2 1/2 cups sugar (this recipe uses white cane sugar: alternative sweeteners may affect color and set of jelly)
- Optional: 1/2 teaspoon butter (to reduce foaming: add at any point during the cooking process to reduce foam)
- Heavy-duty 6-8 quart pot or stockpot
- Water bath canner & rack
- Canning jars (recipe makes about 4 half-pints, or 8 four-ounce small jelly jars) with fitting canning lids and rims
- Jar lifter
- Ladle
Instructions to Make the Jelly
Before you begin:
- If you are canning your jelly, make sure to start up your water bath canner, and get it nice and hot before you start your jelly. You don’t want a canner full of cold water when you’ve got jars of hot jelly that need processing!
- To start your water bath canner, begin by washing out your jars to make sure they’re completely clean, and put them in the water bath canner. Fill the canner with enough water to cover the jars by at least 1 inch. This lets the jars slowly heat up, preventing them from shattering when the hot jelly gets poured in, and also sterilizes them.
- When the water comes to a boil, make sure to let the jars boil for at least 10 minutes before using. Alternatively, you can simply run your jars through your dishwasher’s sanitize cycle, timing so it ends and the jars are still hot when you’re ready to ladle out your jelly.

Cooking the jelly:
- Pour the tea into 6-8 quart stockpot. If you’re using frozen tea, either thaw it out in your refrigerator for a day or so, or to speed up the process, just drop the frozen tea in a pot over a low burner and heat it until it’s fully melted back into liquid.
- Add the 2 tablespoons of lemon juice to the tea and stir. This will slightly change the color of your tea. The lemon juice, when added, sort of strips out a layer of blue from the tea: you end up with a deep, deep, navy-ish purple color.
- Measure 2 1/2 cups of sugar into a bowl. From this bowl, scoop out 1/4 of a cup of sugar, and set the bowl (which now has 2 1/4 cups of sugar in it) aside. Place that 1/4 cup of sugar in a new bowl.
- Add the packet of powdered pectin to the 1/4 cup of sugar, and mix together. Add this to the black pansy tea & lemon juice mixture in your pot, and mix. Place this on a burner turned to high heat.
- Stirring constantly with a spoon or whisk, bring to rolling boil. Once it’s reached that point, stir in the remaining sugar all at once. This will stop the boiling for a moment. Return it to a full, rolling boil again, and boil for exactly one minute, still stirring constantly. If you need the butter to reduce foaming, odds are you’ll probably end up adding it here. The jelly will boil up vigorously as it cooks – make sure your pot’s big enough to handle it!
- After one minute, remove from the heat. The jelly will begin to set up fast, so moving quickly and carefully (don’t burn yourself!), ladle or pour the hot jelly into your sterilized jars, leaving a 1/4 inch headspace at the top if you’re canning. Some air bubbles or a film might form on the top surface of jelly – you can skim those off, if you’d like.
- Wipe off the rims of the jelly jars with a damp rag to remove any sticky spots of spilled or splashed jelly that could interfere with sealing.
- Place the lids on top of the jars, and secure in place by firmly screwing on the rings.
If you decided not to can your jelly, leave it where it is for the next 12 to 24 hours to cool and rest. After that, move your jelly to your refrigerator, where it will keep for about 3 weeks.
If you are canning your jelly, this next section will tell you how to do it!

How to Water Bath Can Black Pansy Jelly
Preparation
- Before you made your jelly, you should have had your water bath canner filled with water and brought to a boil, ideally with the jars you planned to use to can with set inside to heat and sterilize.
- The water bath canner should have enough water inside of it that it will cover all of your jars with at least 1 inch of water.
- The jars inside your canner should be set on the wire rack included in the canner, with the uncovered mouths of the jars facing up.
- The jars themselves should be completely filled with water. By setting them like this in the canner and bringing the water inside to a hard boil, allowing it to boil for at least 10 minutes, the jars will be sterilized from their hot-water bath, and nice and hot when you pull them out.
Safety tip
Always make sure to only ladle hot jelly into hot or warm jars. Ladling boiling hot liquids (such as our jelly here) into cold jars can sometimes cause them to crack or break.
It is also important that your jars aren’t cold when they are lowered into the boiling-hot water of the water bath canner. Failure to do so also carries the risk of the jars shattering.
When the jelly is ready to be ladled into jars, remove your canning jars from the water bath canner, dumping out the water inside back into the canner, and place the hot jars onto a towel. Leave the water bath canner as it is- don’t turn off the heat.
Filling & Canning
- Follow the instructions above for filling your jelly jars and securing the lids and rings. Make sure to check that the rings are firmly secured.
- Once filled and completely secured, lower the jars carefully one-by-one into the water bath canner with a jar lifter. Once all jars have been submerged (make sure they’re covered by at least 1 inch of water) cover with the water bath canner lid.
- Bring the water inside back to a full boil. Process the jars in the water bath for 10 minutes.
- After these 10 minutes of processing, turn off the heat, remove the lid, and lift the jars out from the water bath canner. You can use a jar lifter, or carefully lift out the entire wire rack by the handles. Whatever you choose, be careful! The water is boiling hot- make sure not to burn yourself!

Let Cool
- Place the jars on a folded towel to catch the water. Leave them there to cool, undisturbed, for at least 12-24 hours. You might hear some popping noises, even as you pull the jars out the water, maybe after they’ve been sitting a while- that’s a good thing! That ‘pop’ is the sound of a successfully sealed jar.
- 12-24 hours later, your jellies will be completely cooled. Store them away in your pantry or storeroom as desired. Unsealed jellies that didn’t have their seal take need to be stored in the refrigerator, and should be used within 3 weeks.
(Tip: Remove the rings before storing jars of jelly so they won’t get rusty!)
Shelf Life & Storing Black Pansy Jelly
Successfully canned black pansy jelly is shelf stable and will remain good in your pantry or storeroom for 1 year.
Once the seal is broken and the jar is open, store the jar in your refrigerator. Use within 3 weeks of opening.
F.A.Q.
What does black pansy jelly taste like?
Black pansy jelly is a faintly-flavored jelly. When eaten in a spoon by itself, we think it has a hint of grape-like or possibly berry-like flavor. When spread on something like toast, it reminds us of a very light grape jelly.
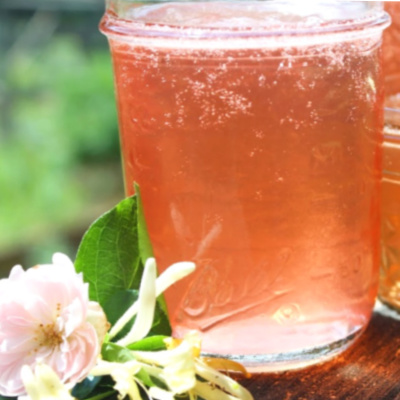
My jelly turned bright pink! Why?
Your tea might not be concentrated enough, or your flowers may have been more purple than black. Make sure to use plenty of the darkest pansies you can find for a darker jelly. Don’t worry though – your jelly is still usable and ready to eat!
Do I have to use white sugar? Can I use honey/other alternative sweeteners?
We haven’t tried any other sweeteners with this recipe, but you are of course free to experiment! While we’ve made other jellies using honey and Ball’s low or no sugar needed pectin in the past, we’ve only made this recipe with white sugar, so can’t be certain how alternative sweeteners will work out.
If you do decide to try switching out the white sugar, be aware that it’s possible the jelly might not set up well, or it may change the finished color.
What can I do with my black pansy jelly?
Like most jellies, black pansy jelly is good on the usual spread of bread and bread-like goods: toast, English muffins, PB&J, and so on.
With such a dark color, if you like the taste, it’s a possible candidate for jelly roll cakes and thumbprint cookies too! It could also potentially be an interesting unique filling for homemade jelly-filled donuts.

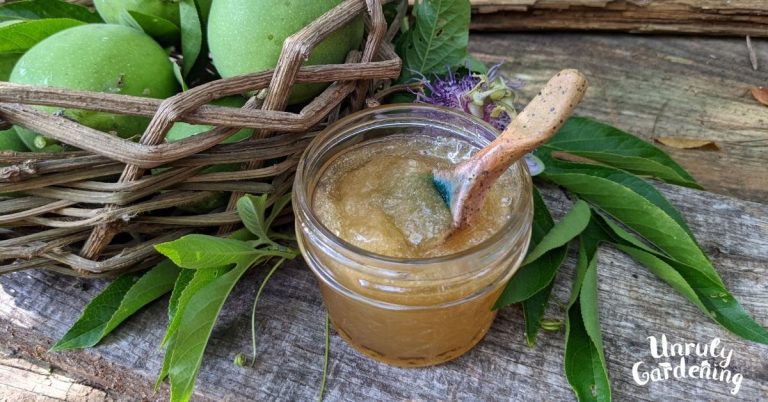
Black Pansy Flower Jelly
Equipment
- a saucepan, to boil water for the flower tea
- heatproof container, for infusing the flowers
- a strainer, to strain the flower tea
- set of measuring cups & spoons
- heavy-duty 6-8 quart pot or stockpot
- a bowl that will hold 2 1/2 cups of sugar
- an equal sized or slightly smaller bowl, for the pectin
- 4 half-pint jelly jars, with their lids and rings
- ladle, or glass measuring cup – to spoon or pour hot jelly mixture into hot jars
- water bath canner with rack, if you plan to can your jelly
Ingredients
For the Black Pansy Flower Tea
- 3 cups black pansy flowers, very loosely packed (fresh or frozen)
- 3 cups boiling water
For the Black Pansy Flower Jelly
- 2 1/2 cups black pansy tea
- 2 tbsp lemon juice (about the juice contained in 1 medium-large lemon)
- 2 1/2 cups sugar
- 1 package Sure Jell low or no sugar powdered pectin (1.75 oz pink box)
- Optional: 1/2 teaspoon butter (to reduce foaming: add at any point during the cooking process to reduce foam)
Instructions
To Make the Flower Tea:
- Place the pansies in a heatproof container.
- Pour 3 cups boiling water over the flowers.
- Cover loosely with a saucer or plate.
- Steep for 20 minutes.
- Strain, using your fingers to press out any extra tea from the flowers. (Your fingers may turn purple at this point!)
- You should end up with about 2 1/2 cups tea. If needed, add a little more water to make sure you end up with 2 1/2 cups liquid.
- Make the jelly now, or freeze the tea to make jelly in the future.
To Make the Jelly:
- If you plan to can your jelly, go ahead and heat up the water bath canner, so the water and the jars within will be nice and hot when you're ready for them.
- Add the lemon juice to the flower tea and stir. This will slightly change the color; you should end up with a deep navy blue, purple-ish tea.
- Pour the tea and lemon juice mixture into the stockpot.
- Measure 2 1/2 cups sugar into a bowl. Then remove 1/4 cup of that sugar. (You'll now be left with 2 1/4 cups of sugar in the bowl. Set this bowl aside.)
- Put the 1/4 cup sugar into a second bowl and add the box of pectin. Mix the pectin and 1/4 cup sugar together really well.
- Add the pectin + 1/4 cup sugar mixture to the tea and lemon juice mixture that's in the stockpot.
- Place the pot on a burner turned to high heat.
- Stirring constantly with a spoon or whisk, bring to rolling boil.
- Once it's boiling, add the remaining 2 1/4 cups sugar all at once to the pot.
- The boiling will stop for a minute. Continue stirring and return the mixture to a full rolling boil.
- Boil for exactly one minute, stirring constantly.
- If needed, add the butter at this point to reduce the amount of foaming.
- After one minute, remove from heat and ladle into jars. You could alternatively pour the hot jelly mixture into a warm pyrex measuring cup and use that to pour the jelly into the half-pint jars.
- Wipe the rims of the jars with a damp rag to remove any sticky jelly residue that could interfere with the seal.
- If you don't want to can your jelly: leave the jars undisturbed for the next 12 to 24 hours to cool and rest. After that, move your jelly to your refrigerator, where it will keep for about 3 weeks.
- If you want to can your jelly so it lasts longer, read on!
How to Can Black Pansy Jelly:
- Carefully place the filled jars down into the hot water of the water bath canner.
- Make sure that the jars are covered by at least 1 inch of water. If needed, add more hot or boiling water to cover the jars.
- Cover the water bath canner and bring the water to a boil.
- Once boiling, set a timer for 10 minutes.
- After 10 minutes, carefully remove the jars from the canner and place on a towel.
- Leave undisturbed for at least 12 hours, or preferably 24 hours.
- Check the seals. Any jars that failed to seal should be placed in your fridge and used up within 2 to 3 weeks.
- Remove rings from the jars that sealed properly, label, and store in a cool spot out of direct sunlight.
- Shelf life of canned flower jellies is about 1 year. Once you open a jar, store it in the fridge and use it up within 2 to 3 weeks.

Beautiful
Thank you Kathy! We were really happy with how it turned out.