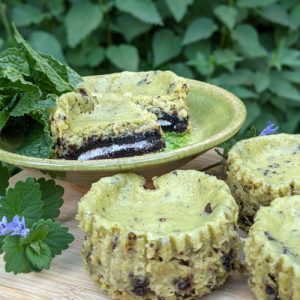
Nettle Mint Chocolate Mini Cheesecakes
These sweet cheesecake treats use pureed stinging nettles to color them a natural shade of green. (They’re also gluten-free, if you use the right cookie as your crust!)

This recipe is an easy way to incorporate a single foraged ingredient into a delicious dessert, without needing to get too adventurous with your ingredient choices.
The stinging nettles sneakily blend in without so much as an odd taste or off-bit of texture to give them away, making them a non-threatening way to take a first step into eating your foraged plants, if you’re not quite up to eating a mouthful of leaves just yet!
How to Blanche Nettles
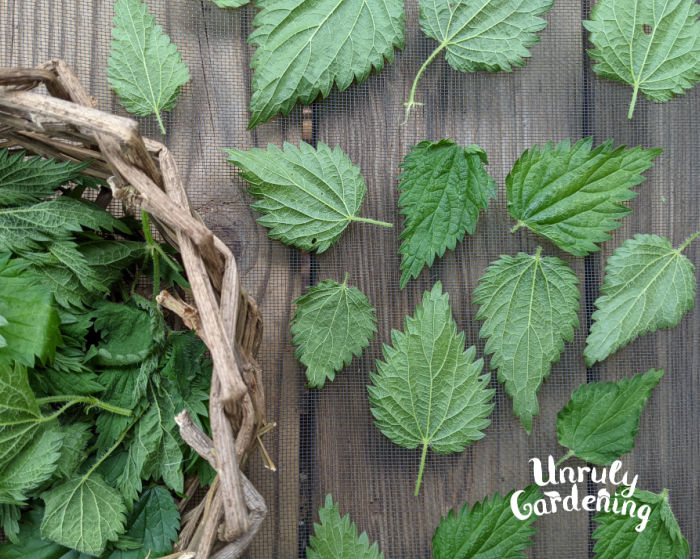
To make these nettle cheesecake bites, you’ll need a basket of fresh stinging nettle tops, gathered before they start putting out flowers. (Check out our post on how to forage stinging nettle here!) Rinse your nettles under cool water to make sure they’re clean and don’t have any hitch-hiking bugs before blanching!
To blanche stinging nettles, you will need:
- Large pot
- Water
- Bowl
- Ice cubes
- Tongs
- Stinging Nettles (Nettles shrink when blanched: gather more than you think you need! For this recipe, aim to gather at least 10-15 nettle tops, just to be safe.)
Blanching
- Pour the water into your large pot, and bring it to a boil.
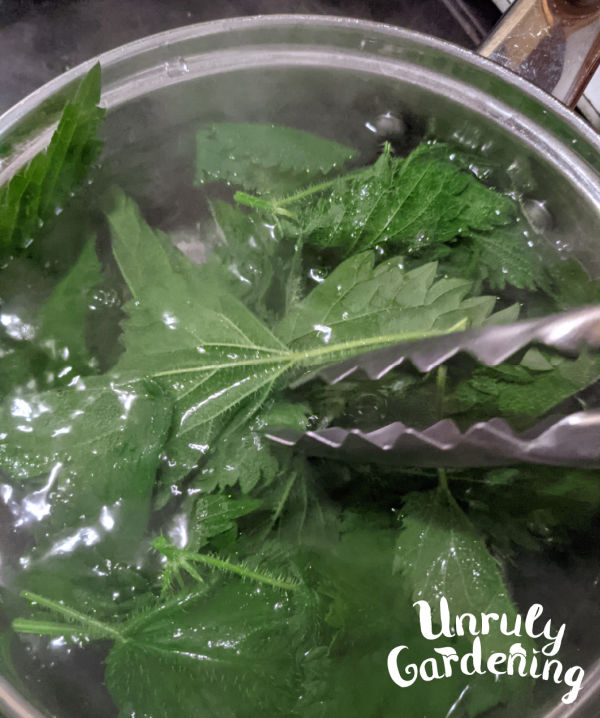
- Carefully transfer the stinging nettles into the boiling water by using the tongs. Set a timer, and let the nettles boil for 4 minutes, using the tongs to dunk the floating nettles under the surface of the water occasionally.
- Nettles will turn a bright, vivid green in the water. They’ll also put off a particular aroma- you might find it pleasant and savory, or you might think it smells green and stinky! (We personally think it smells almost stir-fry like as it boils!) So don’t worry if you notice this smell- it’s part of the blanching process, and, no, your cheesecakes aren’t going to taste like what your kitchen’s smelling like right now!
- While the nettles are boiling, prepare an ice bath by filling your bowl with cold water and adding some ice cubes.
- As soon as the 4 minutes are up, use the tongs to lift the blanched nettles from the boiling water, and dunk them in the ice water bath to stop the cooking process. The water from the blanching will be colored from the boiling- don’t dump this out, but set it aside! We’ll need that water for making the puree in a minute.
Remove the water
The blanching has removed the sting from the nettles at this point, so now, set aside the tongs, and gather up the nettles in your hands from the ice bath. Use your hands to squeeze out as much water as possible from the nettles. They’ll form into what I can only describe as a green ball, and might feel a bit slimy! You’ll want to break this up a bit.
Don’t worry too much about keeping the individual plant stalks whole or anything like that. Just use your hands to tear the mass up into a few rough chunks, and move on to the next step- making the puree!

Making the Puree
To make the puree, you will need:
- Blanched nettles
- Reserved water from blanching nettles
- 1 tbsp measuring spoon
- High-powered small blender- ones used for smoothie-making are ideal
- Drop the nettles into the blender, and add 2 tbsp of the nettle-blanching water. Begin pulsing the nettles, adding 1-2 tbsp of water at a time, until the nettles begin to form a puree.
- The goal here is to end up with a completely smooth puree, with absolutely no chunks of leaf or stem left behind. It will turn into a dark green goop that looks a lot like algae, as it processes.
- The amount of water you’ll need to achieve this will depend, mostly on things such as how much water was left in your nettles. For the batch pictured in this post, it took 8 tbsp of water to get the nettles to form a puree.
- Store nettle puree in the refrigerator after making for no longer than 24 hours. Alternatively, freeze puree in ice-cube trays, and keep frozen for up to 2-3 months.
- One you’ve made your puree, it’s time to make your cheesecakes!

The Cheesecake Recipe
We’ve got our puree! Now, all that’s left is to mix everything together, and cook it!
When making cheesecake cupcakes, remember to let your cream cheese, sour cream, and egg come to room temperature or close before using for smoothest results.
You will need:
- 1 block (8 oz) cream cheese, room temperature
- 1/2 cup white sugar
- 1/2 cup sour cream, room temperature
- 1 1/2 tsp peppermint extract
- 1 tbsp + 2 tsp nettle puree
- 1 egg, room temperature
- 1/2 a bar of dark chocolate, frozen, then beat into shards and pieces with a rolling pin (alternatively, for finer bits of chocolate, you can grate the bar instead)
- 15 to 17 chocolate sandwich cookies/oreos
- Muffin liners
- Muffin pans
How to make:
- Preheat your oven to 350° F.
- Line your muffin pan with muffin liners, and drop 1 chocolate sandwich cookie in the bottom of each.
- In a bowl, beat cream cheese and white sugar together until they’re creamy and smooth.
- To this, add the sour cream, peppermint extract, and nettle puree, and mix until combined- the nettle puree should be smoothly incorporated, turning the batter green. Make sure to scrape down the sides!
- Add the egg. The color of the batter will change slightly, but it should still be green.
- Fold in the chocolate chunks.
- Spoon the cheesecake batter into the muffin cups, but don’t fill them all the way to the top.
- Slide the cheesecakes into your oven.
- Cook until edges of cupcakes are set, and the middle barely jiggles. This should be about 20 minutes. Resist the urge to open the door and peek! Just leave them completely alone until the timer beeps.
- Remove cheesecakes from stove, and let cool on the countertop on a wire rack before transferring to the refrigerator to chill.
- Chill until completely cooled, which should take 3-6 hours. Enjoy!
Yield: This recipe makes about 15-17 mini cheesecakes.
Store cheesecakes in the refrigerator for 2-3 days. Freeze any leftover cheesecakes for up to 1-3 months.
Equipment
- blender, for pureeing nettle
- measuring cups & spoon
- hand mixer, or stand mixer
- spatula, for scraping the bowl
- muffin tins
- cupcake liners, if muffin tins aren't non-stick
Ingredients
For the Nettle Puree
- blanched nettles
- 2 tbsp reserved water from blanching nettles, plus more as needed
For the Cheesecakes
- 8 oz cream cheese, room temperature
- 1/2 c white sugar
- 1/2 c sour cream, room temperature
- 1 1/2 tsp peppermint extract
- 5 tsp nettle puree
- 1 egg, room temperature
- 1/2 bar dark chocolate, frozen then grated
- 16 chocolate sandwich cookies (gluten free or regular)
Instructions
To Make the Nettle Puree
- Drop the nettles into the blender, and add 2 tbsp of the nettle-blanching water. Begin pulsing the nettles, adding 1-2 tbsp of water at a time, until the nettles begin to form a puree.
- The amount of water you’ll need to achieve this will depend, mostly on things such as how much water was left in your nettles. For the batch pictured in this post, it took 8 tbsp of water to get the nettles to form a puree.
- Store nettle puree in the refrigerator after making for no longer than 24 hours. Alternatively, freeze puree in ice-cube trays, and keep frozen for up to 2-3 months.
To Make the Cheesecakes
- Preheat your oven to 350° F.
- Line your muffin pan with muffin liners, and drop 1 chocolate sandwich cookie in the bottom of each.
- In a bowl, beat cream cheese and white sugar together until they’re creamy and smooth.
- To this, add the sour cream, peppermint extract, and nettle puree, and mix until combined- the nettle puree should be smoothly incorporated, turning the batter green. Make sure to scrape down the sides.
- Add the egg. The color of the batter will change slightly, but it should still be green.
- Fold in the chocolate chunks.
- Spoon the cheesecake batter into the muffin cups, but don’t fill them all the way to the top.
- Slide the cheesecakes into your oven.
- Cook until edges of cupcakes are set, and the middle barely jiggles. This should be about 20 minutes. Resist the urge to open the door and peek! Just leave them completely alone until the timer beeps.
- Remove cheesecakes from stove, and let cool on the countertop on a wire rack before transferring to the refrigerator to chill.
- Chill until completely cooled, which should take 3-6 hours. Enjoy!
- Store cheesecakes in the refrigerator for 2-3 days. Freeze any leftover cheesecakes for up to 1-3 months.